Difference between revisions of "Biostructure2023"
| Line 1: | Line 1: | ||
| − | This wiki page is meant to collect information about biostructure work around the | + | This wiki page is meant to collect information about biostructure work around the [[Fun with fungi|Fun with Fungi]] project. |
Both mycelia and kombucha are of interest in this regard. | Both mycelia and kombucha are of interest in this regard. | ||
| Line 39: | Line 39: | ||
'''Preparations for 1 to 2 days before:''' Use the Filter spawn bags and Cable ties (alternatively cord can be used) & make up Substrate to fill them. 20l (2 buckets á 10l) of sawdust (without resin) 10l (1 bucket á 10l) of straw 3l (3 pitcher á 1l) coffee grind (source from coffee shops or bakeries) 1l distilled water, can also be tap water, if without chlorine. | '''Preparations for 1 to 2 days before:''' Use the Filter spawn bags and Cable ties (alternatively cord can be used) & make up Substrate to fill them. 20l (2 buckets á 10l) of sawdust (without resin) 10l (1 bucket á 10l) of straw 3l (3 pitcher á 1l) coffee grind (source from coffee shops or bakeries) 1l distilled water, can also be tap water, if without chlorine. | ||
| − | Mix all ingredients thoroughly to ensure even distribution, the mixture should be humid but not swimming in a water puddle. Cut the the filter spawn bags below the filter and | + | Mix all ingredients thoroughly to ensure even distribution, the mixture should be humid but not swimming in a water puddle. Cut the the filter spawn bags below the filter and save the filters, since they are needed on the moulds the day of the workshop. |
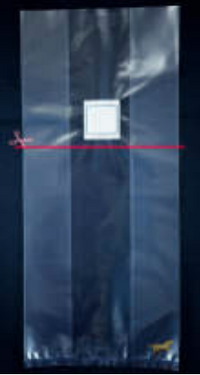
[[File:Filterbag.png|thumb|375x375px|cut the filter off, but save it for later!]] | [[File:Filterbag.png|thumb|375x375px|cut the filter off, but save it for later!]] | ||
Cut 5 bags at once then fill them and see how many more are needed. Fill the bags with the mixture, a little less than half of the bag, then autoclave the bags for 1 hour. After the steam is released retrieve the bags, caution hot, then seal them with the cable ties (cord) as tight as possible. Finally the bags need to cool down over night to be ready to use. A too hot substrate might kill the mycelium. | Cut 5 bags at once then fill them and see how many more are needed. Fill the bags with the mixture, a little less than half of the bag, then autoclave the bags for 1 hour. After the steam is released retrieve the bags, caution hot, then seal them with the cable ties (cord) as tight as possible. Finally the bags need to cool down over night to be ready to use. A too hot substrate might kill the mycelium. | ||
| + | |||
| + | Here is more info from Günter about [https://wiki.hackuarium.ch/images/0/0c/Mold_making_mycelium.pdf making moulds for growing your biostructures]! | ||
| + | |||
| + | =) | ||
| + | |||
| + | '''During the Workshop''' | ||
| + | Making a production line to stay as sterile as possible is important. | ||
| + | |||
| + | The sterile substrate (not too wet! It should stick together but water should not come out, when squeezed in your hand.) is mixed with the ready 'sponge bags' (i.e. pleurote grain spawn) to have a greater volume of substrate mixed in with mycelium. This is put into clean moulds, for growth. | ||
| + | [[File:BiomatIncub.jpg|thumb|Incubated 'fruit bowls' - ready to check!]] | ||
| + | We used big plastic bags closed with a zip tie around cushion stuffing (as the filter). Shown on right. | ||
| + | [[File:Wrappedbiomatwfilter.jpg|left|thumb|A well-wrapped biomaterial object with filter for air entry.]] | ||
| − | + | Wrapping the forms in plastic wrap then adding the filter is one way Günter also recommends. | |
| − | + | ||
| + | '''Post Workshop''' | ||
| + | |||
| + | Good incubation for full colonization of the mycelia into the substrate can take a few weeks. Once things look good, the objects can be taken out (maybe partially) from their moulds and incubated longer, so the surfaces are fully covered with mycelia. Then, the last steps include drying (sometimes in the mould still - the object will shrink), potentially just on the bench (as we have done for some ''F. fomentarius'' forms for the #mycelia4bees project) or at about 50 degrees celsius, with such heating not only drying faster, but perhaps able fully inactivate the mycelia. | ||
| − | + | An impressive example of biomaterial production includes the [https://www.nbcnews.com/news/us-news/fungus-answer-climate-change-student-who-grew-mushroom-canoe-says-n1185401 work by Katy Ayers - making a canoe], the 'Myconoe' that was only dried in the sun and apparently has a mushroom flush after her yearly expeditions! Of course, oven drying at such a scale would be difficult! | |
| − | ( | + | Making big [https://doi.org/10.3390/biomimetics7030129 architectural objects is a further challenge] - could be weird to see such things fruiting after a rainstorm! Segments of the column for [https://far-nyon.ch/festival/section-edition/programme-2023/rot-garden.html this exhibit] indeed fruited within two days of being installed in the space. (Thanks to Floyd JC Sarria, Sara Manente and Sébastien Tripod for the experience with pasteurizing straw and building these, even if most of the first segments got moldy - another risk!) |
| − | + | [[File:Mycelial column.jpg|thumb|A mushroom column an exhibition in Nyon.]] | |
Revision as of 11:53, 2 November 2023
This wiki page is meant to collect information about biostructure work around the Fun with Fungi project.
Both mycelia and kombucha are of interest in this regard.
Here is the prezi around our recent work with these, used for the Biofest to help launch the Thyrea Biofablab. We have also been doing nice workshops with kids from the Collège of Chailly.
Below is info from two documents from Günter Seyfried advising preparations for workshops.
Preps for Biomaterials workshops
Needs for a "Mycelium Biomaterials" session for 20 participants :
Scissors
Boxcutters
Rulers
Cutting bases
6 x rolls of cling film (plastic wrap)
14 x rolls of adhesive tape
60 x filter spawn bags
1x Vacuum sealer
Plenty of tetra packs, plastic bottles, Tupperware, ceramics like cups, or bowls
Latex gloves
1x euro box or large plastic bowl
2l of isopropyl
6x kitchen rolls
Preparations for 1 to 2 days before: Use the Filter spawn bags and Cable ties (alternatively cord can be used) & make up Substrate to fill them. 20l (2 buckets á 10l) of sawdust (without resin) 10l (1 bucket á 10l) of straw 3l (3 pitcher á 1l) coffee grind (source from coffee shops or bakeries) 1l distilled water, can also be tap water, if without chlorine.
Mix all ingredients thoroughly to ensure even distribution, the mixture should be humid but not swimming in a water puddle. Cut the the filter spawn bags below the filter and save the filters, since they are needed on the moulds the day of the workshop.
Cut 5 bags at once then fill them and see how many more are needed. Fill the bags with the mixture, a little less than half of the bag, then autoclave the bags for 1 hour. After the steam is released retrieve the bags, caution hot, then seal them with the cable ties (cord) as tight as possible. Finally the bags need to cool down over night to be ready to use. A too hot substrate might kill the mycelium.
Here is more info from Günter about making moulds for growing your biostructures!
=)
During the Workshop Making a production line to stay as sterile as possible is important.
The sterile substrate (not too wet! It should stick together but water should not come out, when squeezed in your hand.) is mixed with the ready 'sponge bags' (i.e. pleurote grain spawn) to have a greater volume of substrate mixed in with mycelium. This is put into clean moulds, for growth.
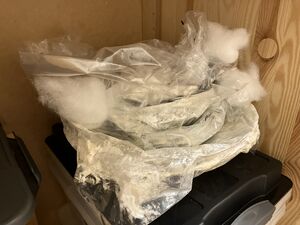
We used big plastic bags closed with a zip tie around cushion stuffing (as the filter). Shown on right.
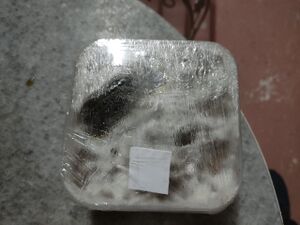
Wrapping the forms in plastic wrap then adding the filter is one way Günter also recommends.
Post Workshop
Good incubation for full colonization of the mycelia into the substrate can take a few weeks. Once things look good, the objects can be taken out (maybe partially) from their moulds and incubated longer, so the surfaces are fully covered with mycelia. Then, the last steps include drying (sometimes in the mould still - the object will shrink), potentially just on the bench (as we have done for some F. fomentarius forms for the #mycelia4bees project) or at about 50 degrees celsius, with such heating not only drying faster, but perhaps able fully inactivate the mycelia.
An impressive example of biomaterial production includes the work by Katy Ayers - making a canoe, the 'Myconoe' that was only dried in the sun and apparently has a mushroom flush after her yearly expeditions! Of course, oven drying at such a scale would be difficult!
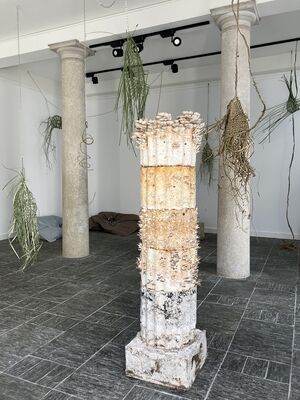
Making big architectural objects is a further challenge - could be weird to see such things fruiting after a rainstorm! Segments of the column for this exhibit indeed fruited within two days of being installed in the space. (Thanks to Floyd JC Sarria, Sara Manente and Sébastien Tripod for the experience with pasteurizing straw and building these, even if most of the first segments got moldy - another risk!)


