Instru Gel Imager
Jump to navigation
Jump to search
The preset 3 is one good setting for gel illumination
"still" will keep the image static if satisfactory
You can select and change imaging parameters with the arrows
Intro
This instrument is used to image DNA gels in order to analyse the result from a PCR or an enzymatic digestion.
Our model
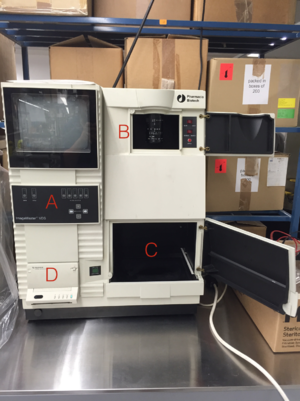
Our model possesses a standard camera and UV lights for DNA imaging. The screen allows you to safely image the gel without being exposed to UV light. You can then print the image.
Parts
- A) Keyboard: You can integrate signal over time and change some of the camera' settings.
- B) Camera door. You can set the camera focus & zoom here.
- B) Camera door. You can set the camera focus & zoom here.
- C) UV board. That's where you put your gel. You can take the tray out.
- D) The printer. The paper might be old but you can still see the bands
How to use it
1) Turn On (behind)
2) Ensure all doors are closed
3) Place your sample on the tray
3) Set up the camera and analyse your gel
4) Wipe the tray with paper when done and turn off
Precautions
- You don't risk much with this device just don't try to play around with the security and burn your eyes.
- Wear gloves when handling the gels. The dyes used can be noxious depending on what you use.
